Pages

Wednesday 14 April 2010

A Walk along Scolty Hills Aberdeen

Scotland is well-known for its nature, mountains, outdoor sports, skiing and unpredictable weather. Scottish culture is very indifferent from the English, Kilt costumes, music, highland dancing are few which is commonly known to many in foreign lands. The outdoor nature beauty is not known to many unless they have step foot into Scotland.

I spend a one of the very first few sunny days in 2010 in Scolty Hills which is located in a claimed 'Posh' area of Aberdeenshire, Banchory.

Scotly is indeed a very quite place, fresh air and surprisingly insect free as well.

Well this is also my first day out with my Brand new Canon Eos 50D. Yes I have converted to Canon now and have left my faithful Nikon D40 after 2 years!! More reviews to come after!

Scolty Tower. Its a 20 minute walk from the very bottom of the hill for  a person with terrible fitness like myself

A distant mountain. TO be honest i have yet to find out the name.
Surprisingly I found some young vibrant university students here on  a Saturday afternoon. I suppose for peace and tranqulity.

Direction dial explaining the location in the distance

Another lady here for peace and tranquillity. I don't think its her dog, however he seems to be absorbed into the distant beauty.

Kid sulking after his dad told him off for making too much trouble up on the Scolty tower.

A view through the stone walls of the tower.

A bright beautiful day 

People actually cycle up these hills! Scottish are very healty bunch of people!

This reminds me of a Movie poster and also my favourite picture!

Stone walls claiming private property of a farm boundary

This is strange colouring which I dint realise when i was there. A solitary tree and a rock in a distant

Sign of Scottish Spring 2010

Nature at its best!

I enjoyed my day and walk. I guess life away from my PS3 is not so bad afterall!

Thursday 1 April 2010

Panorama Feel to Rome

Sometimes its difficult to describe how Huge Rome can be. Summer in Rome with a Gelato in your hands are simply a perfect way to walk around. This pictures are for those who are considering visiting Rome one day!

Pictures are captured with my kit lens from Nikon D40 and stitch with a programme called 'PhotoStich'.
Basically I took burst continuous shots and span the camera left to right to capture the shots. One picture maybe a combination of 9-10 pictures and stitched together using the programme 'Photostich' automatically

ENjoy! Click for larger picture.


Inside the Colosseum 


Grounds of the Colosseum


Top view of the Roman Ruins


Daytime view of the Famous Trevi Fountain

Rome the Beginning

Modern day Italy is filled with Football, Fashion, Beautiful people, brilliant weather and birht place of Pizza. That is a common perception for who have not been to Italy yet. Rome the beautiful capital of a nation once ruled by Julius Ceasar have left an incredible amount of history and culture behind.

Rome is a beautiful city which you would need to spend at least 3-4 days minimum to explore and not more than a week. There are many hot spots like 'Spanish Step ', 'Ruins' and 'Vatican City' which you could easily spend a day there. And some places like 'Trevi Fountain' and 'Piazza Navano' which you would definitely visit at least twice (day and night).

Italy's architecture and vivid colour makes it a photographers heaven to visit. You simply cannot put your camera down if you're in any of their hot spot. Rome is so crowded and picture taking of the crowd can be quite entertaining. You can simply see and meet people from all over the world. Everyone have one attitute in common. Laid-back & Relax!

All my photo are taken by my D40 with kit lens, which is light and easy to travel with. 90% of the picture are taken with auto mode. Only thing i needed to tweak is flash on or off.
Enjoy the pictures!

A Typical Street in Rome. Adventurous colours for a building.


The Colosseum. Its a must to go in. Being inside and outside is simply breadth taking. 


The walk towards the Colosseum is simply remarkable. Most of the time you would stand and look around.

One of the three brides we met walking around the Ruins of Ancient Rome

The Pantheon, which Robert Langdon (Da Vinci Code) reckons there was a clue inside.

Cant Remember the name of this building.

Fountains provides fresh drinking water for everyone. This one just outside the Spanish Steps

Inside the amazing Vatican Cathedral. Once you've been inside, there is no other Cathedral better.

Monday 29 March 2010

52mm Wide Angle, Macro and Telephoto Lens Kit Review


For my Nikon D40 camera Wide Angle, Macro and Telephoto lenses would cost me the following:-

Nikon AF-S 12-24mm          = £850.00 --------Wide Angle
Nikon AF-S 105mm VRII     = £615.00---------Macro
Nikon AF-S 18-200mm VRI = £620.00---------Telephoto
Each of these lens cost more than my camera itself. I came across a 52mm attachment add-on for my kit lens from Amazon uk. Lens Desciption:-


~52mm Wide Angle + 52mm Telephoto lens Kit! ~ INCLUDES Lens bags! For Nikon D40 D50 D60 D70 D80 D40X and ANY lens with 52mm filter thread!


It only cost me about £18.00 plus free delivery so I decided to give it a go. Took it out to the park for a quick test. I brought my cheap £10.00 Hama 61 tripod along for the test.
Search Amazon.com for tripod hama

Standard VS Wide Angle


The wide angle extension at 24mm is similar to the standard kit lens at 18mm. Which is quite impressive. The picture quality is comparable as well.


However if you lower the lens below 22mm there is the corner distortion. Example shown on the picture above at 18mm. If you look closely at the picture the wide-angle does what it says on the box; more of the bridge at the far end is being seen. This lens is ok if viewed not below 20-22mm. The picture quality is almost kept up to standard.

Standard VS Telephoto

The problem with attaching the telephoto one on is the barrel distortion experience from 18mm to 35mm. Therefore this is not a lens attachement you would one to keep on the whole day.

At 55mm the extension the view is zoom in at least X2. However the picture doesn't look sharp and darker. I do not recommend this extension add on at all.  The Zoom is not that great and the picture quality is not sharp and the barrel distortion effect is simply useless to be kept on.

Macro


I tried macro indoors instead. I am amaze with the results as well. I guess out of the three option the macro photography one is greatly enhanced. I hardly use the the kit lens for any close up, however with this extension it gives me an additional option. All the pictures have been taken with 55mm shot. The distance between object is about 60cm and I can get a good focus on with flash on.

Final Words and Verdict

Out of the two attachment, this one stands out very well. The superwide angle plus the macro addon is great. It is a lens attachment which you can keep on all day for wide-angle and macro photography. Another plus, you can leave your 52mm filter on in between the lens and attachment.
I don't recommend the telephoto one as it doesn't do any justice to tele-photography and quality. 

For £18.00 I think its not much to pay for for additional macro shots.


Thursday 25 March 2010

How to Organise your existing Picture Collection?


Picture Organisation is a nightmare for most people ,unless you're Monica Geller from F.R.I.E.N.D.S. In a Perfect world Monica would organise the pictures by album name, give every photo a unique name, tag every picture into sub-categories, give rating to each photos and make slide show DvD of her best pictures.


In the real world, this doesn't happen. Digital photography today enables us to capture pictures almost unlimitedly (cheap memory cards). Common bad habits are; download everything onto the pc desktop and to be left unattended for a long period. When grandparents visits your home, you can't find pictures from your 'Nepal Hiking Trip', instead you accidental open your 'Spring-Break Weekend in 2002'!. Stupid Cameras are made to give unique names such as DCM00, DCM01 and they all seem to look the same!

There are a number of programs out there that offers picture-viewer which includes auto scanning of the entire hard-drive and ascends the picture by date. Most of the time it doesn't do what you want! Unless you own a MacBook or any Apple Desktop; iPhoto is a wonderful program which organise your pictures automatically (if you permit) into folders (under year taken). In the iPhoto Viewer all the pictures are displayed by the dates, therefore latest pictures first. I cannot afford iPhoto, because I cannot afford a MacBook. Cheapest one is about £800.00 approximately. Thats a trip for two to Egypt, Hawaii Beach or even Thailand. I rather spend the money on travelling and capturing beautiful pictures!

Now I would like to showcase my organisation technique, 'Love it by Year'. 
It took me quite a while before I settled for this method.
This method is divided into two Sections:-

1. Organising the Existing Pictures
2. Highlight Pictures (Selective Filtering) for your visitors or Grandparents


What you will need?
-Picasa 3.0
(Free to Download, Click Link)

1. Organising The Existing Pictures


I would recommend the best way to organise your picture is by YEAR. Year means pictures produced during the date, or how you can remember the picture by e.g Christmas 2001, Summer Picnic 2003. I am pretty sure most of you probably  have your picture collection up till 2000 the most (thats when digital photography boomed). So all you have to do is create 10 folders from 2000---2010. And located your pictures into folder form.

Don't bother with deleting repeat pictures, or badly taken ones. All you need to do is get a little organisation in shortest time possible and not delete anything. Dwell on the little details only if you spare time in future.

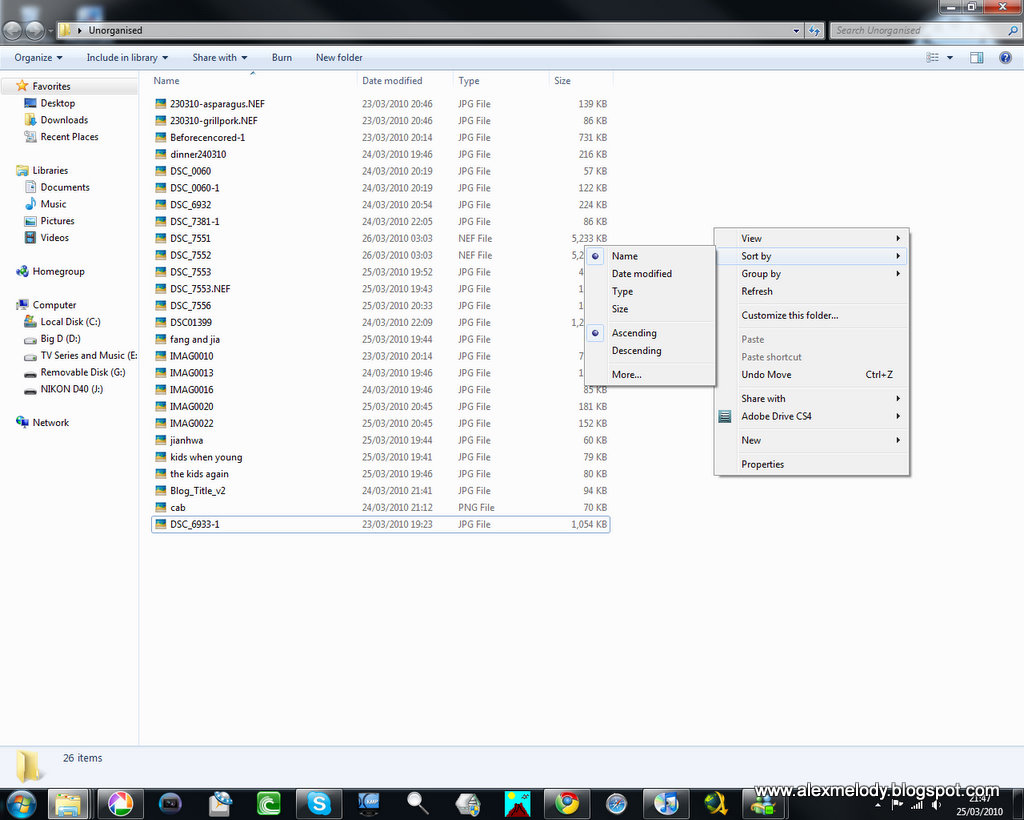
-Create a Folder called 'Unorganised' and dump all your pictures in there (with or without a folder)
-Search every pen-drives, memory card, portable HD etc.

Right Click, Go to More


Organise by Date Taken


Ones with no dates just keep them aside and sort later. Open a folder called undated. This will not be more that 5% of your pictures.

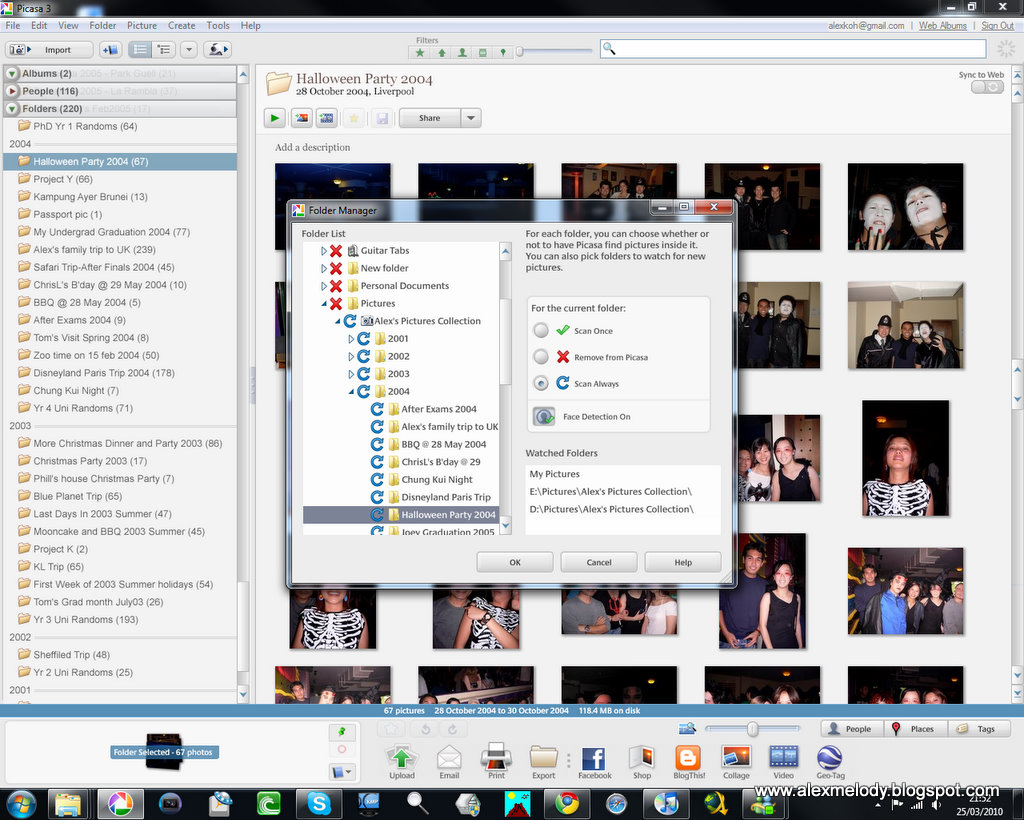
Now Open your newly FREE Picasa 3.0
Go to Tools---Folder Manager. Choose or target the folder which you've chosen just now.

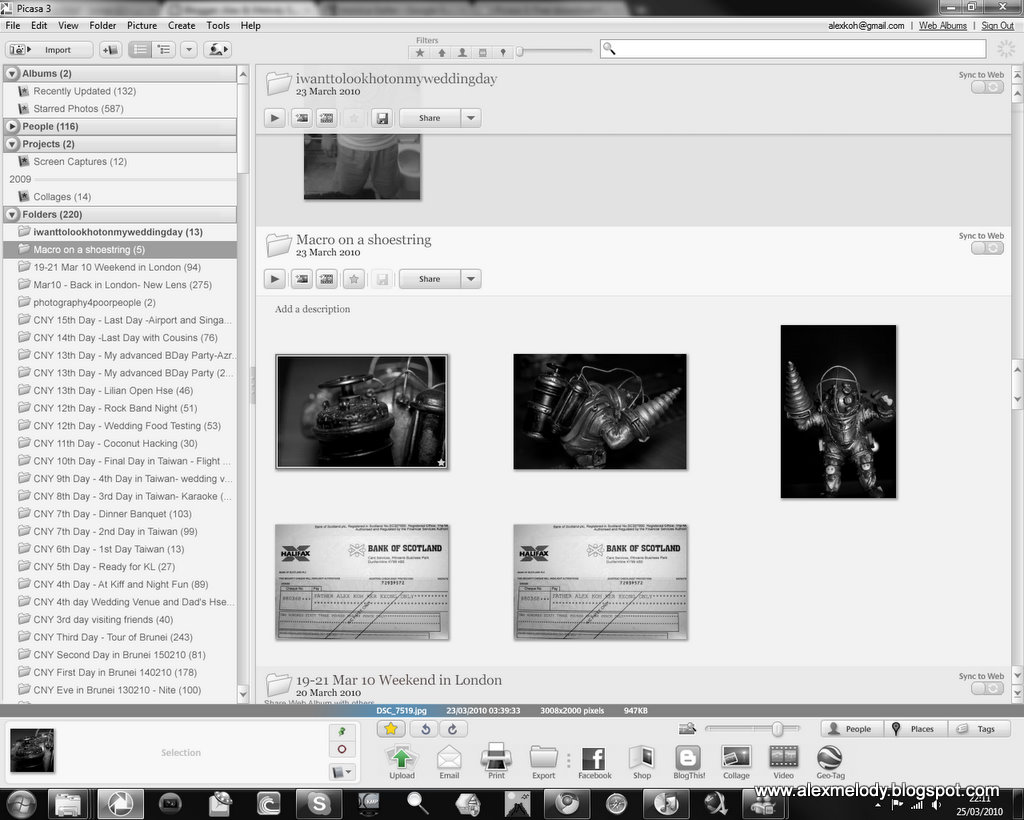
Once the scanning is complete, you will notice that Picasa 3.0 organises your folder by year and also in the order the picture is Taken.

This is the fastest way in which you can organise your already taken pictures in a better way. Its easy to navigate and find the pictures as well on Picasa. Having the Left-hand bar/menu to navigate like windows explorer and the right window to view the exact pictures (automatically organised by date taken)

I highly encourage organising by year because its easy to back up pictures by year as well.

2. Highlight Pictures for your visitors or Grandparents


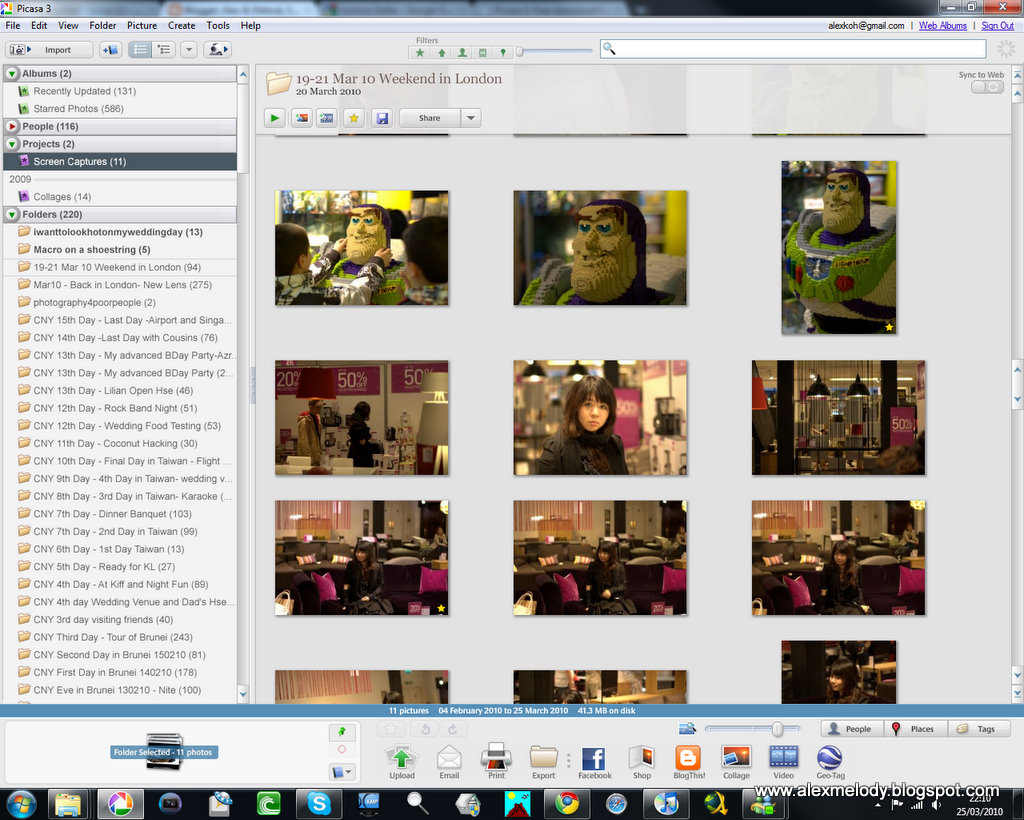
My favourite part of Picasa is the 'One-Star' voting system. Some programmes have a 5-Star voting system which causes havoc with dilemma; in the choices of the pictures. I don't like deleting pictures, cause I can't decide. However my decision making part of my brain works instantaneously when I see a good picture.

When visitors comes around, all you need to show are your highlighted pictures! Not all the 3455478 pictures, cause they will leave before you finish. Highlights are important!!

Click the bright yellow star at the bottom if you think its worthy.

Once you've given a star you can see the star at the bottom left of the picture

Click the STAR on the top (shown in green). This helps filter and display STAR pictures only. (Also helps to filter out the Spring-Break Pictures quickly, provided not STAR-ed)

I hope the readers will find my 'Love it by YEAR' method helpful, easy and non-time consuming method of organising your picture collections. Feel Free to email me on any other details.

Thank you!!

Wednesday 24 March 2010

Photography on a Shoe-String Budget.

Digital Photography have revolution how the world captures an image in a static form. Mobile phones, mp3/ipod and camera are the top 3 most important things in a women's handbag, teenager's baggy trouser and any travel suitcase. 

However taking a nice good picture ,to post up on a blog or a nice poster print, can be a difficult task. Every mobile phone now has a built in camera, but still not great enough to capture amazing shots. Pictures outcome are commonly blurry, too dark or even too slow to capture the best moments.

I would highly recommend anyone investing on a DSLR today. Its cheap, affordable and very easy to use. Its a long term investment as well as a tool to help capture moments which would never be seen again. Have you walked down a beach and enjoyed the view so much hoping you can see it once more when the winter snow comes in? Have you ever walked on the great wall of china and wish to share your experience with your mates back home? Have you ever seen your baby daughter smiled during her 3rd birthday party and wished you could have shown her the very moment with her wedding night?

Investing on a good camera (yet cheap) will help you do all these possibilities. It does help me touch on my artistic and creativity side as well, since i am a a boring engineer.

Since DSLR have become very very cheap indeed from various inter-competing companies like Canon, Nikon and Sony. I will spare the details on technological advancement and the economy of these companies and just get straight to the point on how we can be a good photographer on a shoestring budget.

Firstly I would like to share some of my favourite pictures with everyone.


Macro shot with kit lens on a Bioshock Model


Tim Burton Theme shot of a town called Aberdeen in Scotland


Opening of a new cake shop in town.

My Wedding Venue!

A night in Florence Italy

A local night event in Brunei on Chinese New Year 2010

Lion Dance in Brunei during Chinese New Year 2010

All I used in all these pictures displayed are:-

1. Nikon D40 with Kit Lens (£250 after cash back rebate from Nikon)
I own a Nikon D40, which i bought just for £250 (in 2007) with a 18-55mm kit lens included. Taking the advise from Mr Ken Rockwell (www.kenrockwell.com), we don't need a $5000 camera to take nice pictures. All we need is a basic 30 buck camera we can do the very same. But I am not as an expert as Mr Ken Rockwell himself, I have invested my good £250 for a longer term. Basically it increases my probability of taking better pictures as well.

2. Editing Tool - Picasa 3 (Free from Google)
I don't use any expensive photo shop programme at all. All the picture shown are basic edditing from these programmes. Except for theme burton above where i use Photomatix for a very cheap fee.

3. Additional items
A nice looking crumpler bag if i am doing urban photography. I have too look cool as well if i am taking pictures with women around. (£25)

A 8G memory card which i got from play.com which can allow me about a thousand pictures on 6meg. (£12)

4. Things i Don't even own yet!!

-TRIPOD - important for night photography, dont need one cause i can find things which my camera can sit on for stability

-flashgun - i dont even have these yet. I just try multiple times till i get a good shot, or just a pair of steady hands will do.

5. Macro Lens
My first picture macro shot only cost me additonal £17.00. Its just a macro lens convertor which i got from amazon.co.uk. Don't need a £700 lens as this one will do just fine! Just need the patience to do so!

6. Other items you might need.

-Patience - your first 10 good pictures may come from a batch of 1000 pictures. take your time cause its a learning curve on creativity and the physics of light.

-Sharing information - a good photographer does not work alone in isolation. feedback and reviews are important for others to comment. Its a good feeling sometimes when someone thinks your picture is excellent and give their views about it. I do mine alot on facebook.

-Observationary - Yes i came up with that word. Its being observant with great vision. Just imagine looking at something and hoping to capture it with a basic pin-hole camera and make it last a long time. No...er...wait, u can do the same with a DSLR at a shorter time span.

-Other people's work and vision - many can be learned from others. keep your eyes open on other people's work as well.

What you dont need!
- A $5k budget on your camera and kits
-50megapixle camera 
- biggest lens available
- travel the world - you may even capture an award winning picture from your own garden.

Last piece of advise! Get out there and start snapping pictures. No one learns photography from classes alone, listening to blogs alone or buying the top end product. All you need is passion to go out there and capture the moments!